
- LeiPang Glass Hardware Manufacturer Co., Ltd.
- Main products:floor spring ,patch fittings ,glass gate lock
Home > Company News > Installation Steps for Floor Hinges

Company News
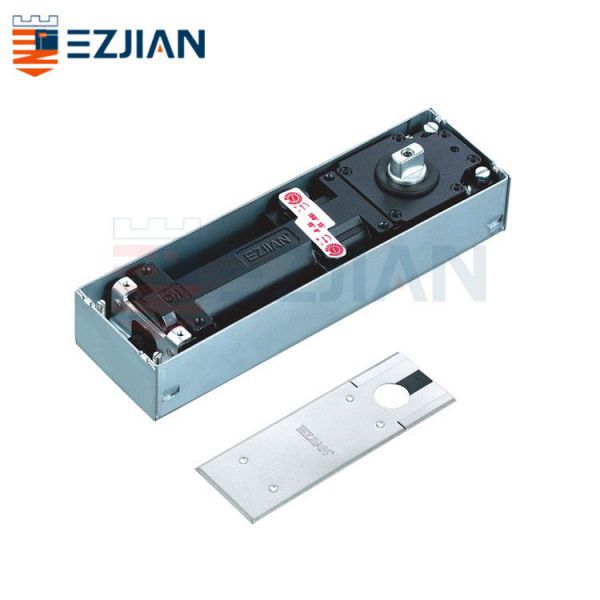
The floor hinge is a hydraulic door closer, except that the device for pressing the spring is a worm gear instead of a gear and a rack. Because the worm gear can rotate forward and reverse, the floor hinge can be used for doors that open in two directions, while the door closer can only be used for doors that open in one direction. The key to the technology of the floor hinge is the load-bearing seat under the main shaft, which determines the load-bearing level of the floor hinge. Today Shower Hinge Manufacturer will introduce the installation steps of the floor hinge.
Installation steps:
A. Draw a line so that the center of the hinge axis of the floor coincides with the axis of the door clamp.
B. According to the instructions and the actual object, make a hole in the ground, and the size of the hole must be tightly matched with the floor hinge housing, and cannot be loose.
C. Place the floor hinges into the opened holes and straighten them.
D. Lift the door leaf with the door clamp installed, and insert the rotation axis of the floor hinge into the rotation axis hole of the door leaf.
E. Adjust the screws in the three directions of the floor hinge. Keep the door leaf vertical, and the axis of the upper and lower rotations coincide.
F. Adjust the speed of closing the door.
G. Cover the floor hinge. The accuracy of the installation of the floor hinge has a great effect on its service life. The quality defects of floor hinges are: oil leakage from the body and eccentric ground axis. The body oil leakage is caused by the floor hinge casting process. If the trachoma is caused during the casting process, the internal hydraulic pressure of the body will increase, resulting in oil leakage. The eccentricity of the ground axis can cause the door body to deviate from the center line of the door after installation. Although some quality defects can be compensated by adjusting the position of the body, it is best to contact the manufacturer to replace it. The end of the service life of the floor hinge is the leakage of the shaft center and the weakening of the elastic force. If the connection between the axis of the floor shaft and the main shaft of the floor hinge is not strictly vertical to the ground, the movement of the door leaf will bring great torque to the floor hinge and increase the main shaft Wear between the bearing and the bearing eventually leads to oil leakage from the shaft. The spring will inevitably weaken the elastic force after a long-term stretching movement.

Floor Hinge
Floor Hinge slotting detailed construction method:
The first step is to determine the slot position: first remove the main body of the floor hinge, and place it in a predetermined installation position. At this time, take a plumb line to place a vertical line from the center of the top axis of the floor hinge, and then move the floor. Position the hinge so that the center of the plumb body is placed at the center mark position of the flat axis of the floor hinge, and pay attention to the horizontality of the floor hinge, the verticality of the front, rear, left and right directions, and then outline the outline of the floor hinge body.
The second step is to perform grooving: cut the edge of the contour area of the floor hinge that has been drawn with an angle grinder to cut a slot with a depth of about 3-5MM, and then use an electric hammer or a hand chisel to dig the contour area of the floor hinge. Floor materials, which can be used repeatedly with angle grinders, electric hammers, chisels, chisels in detailed areas, electric hammers for larger materials, and angle grinders can be used on the sidelines, while measuring the depth of the floor hinge grooves, at close to thickness When dimensioning, you can put the floor hinge body into the floor slot to see if it can be kept below the ground.
The third step is to stabilize the floor hinge body: when the floor hinge body can be completely placed in the floor groove, the stabilization step of the floor hinge body can be performed, but cement can also be used, but the cement set time is longer. Take out the floor hinge body, add an appropriate amount of quick-drying powder in the floor groove, stir it with water until the consistency is appropriate, then put it in the floor hinge body, and then use a rubber hammer or block to hit the floor hinge with a hammer to make the floor hinge You can restore the level of the surface and the surrounding ground, then take the plumb line to find the axis position of the floor hinge, and fine-tune the floor hinge body. After the above three steps, the slotting process of the floor hinge body is completed.
The above is the installation steps of the floor hinge introduced by the supplier of Shower Door Hinge.
-
 sand casting railway engineering machinery parts steel casting for railway
-
customer designed steel casting for gearbox cover
-
China supplies cast iron casting pump body parts
-
precision casting polymeric Insulator flange post insulator fitting
-
polymeric insulator fittings railway insulator fittings
-
composited insulator end tongue and clevis fitting
-
spring for medical shadowless lamps
-
Stainless Steel matel Spring Small Tension Spring
-
Compression Springs Wave Springs wavy spring
-
Spring Of Car Safety Belt Flat Torsion Spiral spring Rewind Power Spring
-
Torsion Spring Carbon Steel Compression Spring For robot
-
Tension Spring With Pull Ring Custom Extension Spring Tent Fixing
-
Customize torsion springs for medical equipment.
-
Small torsion springs for medical equipment
-
stainless steel spring mechanical and electrical take-up coil spring flat spiral reset spring
-
High Strength Custom Flat Coil Springs Stainless Steel Spiral Constant Force Power Spring
-
Custom Flat Multi Wave Spring Manufacturer Compression Corrugated Spring Wavy Springs
-
MultiWave Springs Wave Compression Springs with plain ends calculation
-
Custom high-precision stainless steel washer compression wave springs
-
Coil Spring For Tape Measure, Spring Of Car Safety Belt, Stainless Steel Spiral Springs
-
High Grade New Design Flat Wire Wave Spring Used In a Variety Of Industries Wave Spring
-
single turn wave spring washer wave spring precision for motor
-
Custom Compression springs Manufacturing Factory Customized Durable Stainless springs Small springs With Long Service Life
-
Climbing safety rope coil spring Flat Torsion Spira Spring Carbon steel coil spring